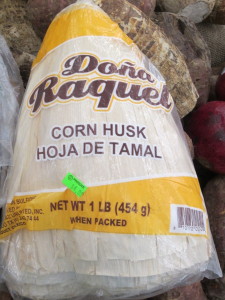
School was a half-day today, so even though one kid spent hours at a friend’s house and the other spent hours at gymnastics, we managed to fit in a little crafting. I’d had corn husks in a cabinet forever from sometime when they were on sale. You can use actual greenish corn husks off of, you know, corn, or you can buy a bag of corn husks at the grocery store–they’re used for wrapping tamales, so you can find them with random obscure produce or next to the Goya and Badia stuff. Here are some I just spotted at Price Rite (where it is $1 pomegranate time!).
All you need for this craft is husks, possibly a bowl of water, some string, and scissors. If you want to get super-crafty, you can use fabric scraps, yarn, glue, and markers to accessorize your doll.
Our store-bought husks were all dried out and crinkly, but we just put them in a bowl full of warm water. No soaking overnight for me: I’m too impatient, and they’re pliable right away.
 I first learned how to make Corn Husk Dolls twelve or thirteen years ago as part of my job as a museum educator, and I followed the directions at Teachers First. Since then I’ve been on roughly a decades-long hiatus in doll-making, and meanwhile a mysteriously similar set of instructions appear on Martha Stewart.com, but with way better production quality. Not like I’m bitter or anything, but the teachers were first.
Anyway, I didn’t actually look up the directions before doing the corn husk dolls today. As soon as the girls sensed craftiness, they descended, and I got a little overeager and just decided to wing it. Because that’s how I roll.
Okay, so first you take several husks and bunch them together and tie them about an inch from the top.
Someone paying attention to the directions here would trim the top like the teachers tell us so that it’s rounded to produce a sleek and shapely head. We did not. Then, you grab it by the tied end, and you pull the husks down. Back in the olden days, when I’d be doing this in a small farmhouse room filled with 28 children, I’d instruct them to pretend that it was a banana that they were unpeeling.
Once you’ve peeled the banana, the tied one-inch portion is hidden under your folded-over husks.
Then you tie this new top tightly–the string you’re using here is the doll’s neck, and you’ve just created her head.
Next, get a single husk or a couple of strong husks. Roll it up tightly and tie a string on each end: this single long piece is going to be the doll’s two arms.
Here I am separating my doll’s husk–I’m about to slide the arms piece in so that it’s tucked just below her neck.
Then you can take another string to tie a waist (whoops, looks like I hadn’t made her hands yet in this picture–step-by-step instructions from long ago-educators and/or convicted domestic goddesses may be more helpful than my disorganized methodology. But I’ve already uploaded the pictures, so you’re getting them, anyway.)
Okay, that’s the basics. You can also add shoulders (I forgot about the shoulders, so I didn’t), or you can take a second little bunch of husks and tuck them under the existing husks and fix them there by tying it around the waist (for the doll above, I think I replaced this waist by another one tied tighter), and it ends up looking a bit like an apron over a fuller skirt. If you want to make a boy, you can separate the lower part of the husks into two and tie them into separate legs to make a pair of pants. I encouraged the girls to try this, but neither of them wanted to do it, and frankly, neither did I. Incidentally, when I used to do this with classes full of kids, the boys would be just as excited as the girls. I also had the boys embroidering. So don’t assume this and other activities won’t fly with the young men in your life.
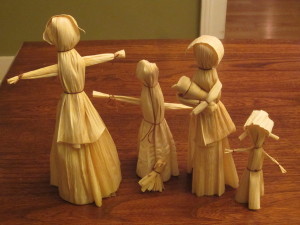
Here are the dolls we made:
M really liked the hat concept, but all of the hats your see worn here are just scraps of husks balanced on their heads–obviously, you could glue them if you wanted to do that. I’d suggested yarn hair, but everyone was pretty much in love with the corn husk as medium today. In fact, the girl on the right has pigtails that J created by following the Arm Creation Methodology. Cute, yes? The two taller dolls have the second set of husks to give them fuller skirts. And the mama holding a baby is held together with a toothpick. It looks very adorable as-is, but when I first put it together, her arms kept popping out, and she’d be left with a toothpick-punctured baby, so that was a little bit ghoulish. Eventually I wrapped both of her arms, and then she and the baby were fine.
So there you go! A fun little autumn craft with plenty of flexibility to make whatever little creatures you want. It helps if your crafter is able to tie string unassisted like mine are. But this isn’t a problem if you’re working on a small scale of just one or two non-tying kids (as opposed to a class full). To put together all of the dolls in the picture above, we used up most of the package of corn husks that we had, but our supply was smaller than the package pictured above. And you can always buy an extra package. If you don’t craft them up, maybe you can learn to make tamales?


Claire
Wow, I am really impressed! I had a corn husk doll as a child, but I never met anyone who actually made them.
Katie
@Claire–no need to be impressed! As demonstrated above, “even a child” can make them. And they’re super-cute as a Thanksgiving table decoration, too. Glad you’re enjoying daylight savings. That makes one of us.
JM
Love the idea. They all looked amazing. Can’t wait to try it!
Katie
@JM, thanks! It’s fun. And since we made then, we’ve had a couple of kids over and everyone wants to make them. I’m going to have to go buy some more husks.